Monday, 5 December 2016

Error 927 on Play Store: How to fix it

Error 927 is another bug that is found on play store when downloading or updating application/game with play store on an android operating system. Error 927 is not a permanent error, it is not Bug that cannot be solve or that require factory reset to work. I know your coming across this page means that this problem is what may have lead you to this post. I bet you to relax and try these few methods that have been tested and proven to help solve error 927 on play store.

Method one to solve Error 927 on Play Store
clear data, cache and force stop then retry the download.
1. Go to "settings"
2. Click "App"
3. Click "All"
4. Click "Google Play store"
5. Click "force stop", "clear data", "clear cache"
Method two to solve Error 927 on Play Store
unistall the play store recent update, this is done by following the following the below step
1. Go to "settings"
2. Click "App"
3. Click "All"
4. Click "Google Play store"
5. Click "Uninstall updates"
Method Three to solve Error 927 on Play Store
Remove gmail Account and add again
1. Login to "Gmail Account"
2. Go to "settings"
3. Click on "Manage account:"
4. Click on "Google"
5. Remove "Google account"
6. open gmail account, add your details and try download the app/game with playstore.

The above three method is proven to have solve this issues on play store, make sure the step is carefully followed to solve this particular error 927 on play store.
Thursday, 1 December 2016

How to BackUp/Restore Android Contact to Memory Card

Apart From Cloud Backing, backing  contact on memory is one of the efficient method of safeguarding your contact. memory  card is very portable and accessible especially when adopt as a backing up contact for android phone. Memory Card will allow you to do backup and restore without having to connect to internet.
HOW TO BACK UP ANDROID CONTACT TO MEMORY CARD
1. Open "Contact"
2. Click "Menu"
3. Click "Import/Export"
4. Choose where the contact should be copied from (Choose phone since you are backing up android Phone Contact
5. Choose where the Contact should be copied to(choose memery Card)
6. Click "Ok"
 HOW TO RESTORE ANDROID CONTACT FROM MEMORY CARD
1. Open Contact
2. Click Menu
3. Choose Memory Card (Because it was used as the backup)
4. Choose Phone (Where the android contact should be restored to)
5. Click Ok.
 Backing and restoring Contact on android device is very easy and straight forward.


How to Transfer files between Android and computer over WiFi

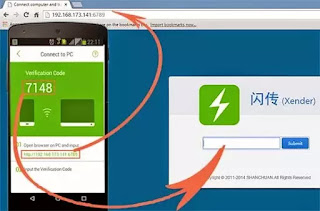
connect android with computer wirelessly

There are many ways to transfer files between an android device and a computer. USB connection can worked well but sharing files over wireless is the more faster and have less connection interference. using WiFi to share files between android and computer can be done in many ways but the method that will be adopt will make used of Xender application.
requirement to share files between android and computer.
1. Make sure the android phone support wireless
2. install Xender application in the android phone
3. make sure the computer have at least one browser installed.
Method to transfer files between android and computer
STEP 1.  Create a WiFi with the Computer and make sure the android phone is connected to it. This is how to create a WiFi on Windows Computer:
      Goto "Control Panel"
      Click "Network and Internet"
      Click "Network  and Sharing Center"
      Click "Set up a new connection or network"
      Select "Set up a wireless ad hoc network"
      Click "Next" "Enter the Network Name", "Security Type" and  "Security Key"
      Click "Next and Finish".
STEP 2.
      Open "Xender"
      Tap the "Menu"
      Click "Connect PC"
      Copy the "URL address and paste it on your browser"
Ensure these steps are followed properly, used upload to copy file to android and download to copy file from android to computer.


How to fix Google play Error check your connnection and try again

Most errors that comes up on Google play are minor settings that is set by us or automatically set by Google play application. When Google play give this error "check your connection and try again", one may think internet connection may be responsible for such issue. Although it may not be internet connection problem. Many problems may be responsible but one of the problem is sure for the cause of this error.
Check the following:
1. be sure the android device is connected to internet or WifI
2. Be sure the Date/Time is correct
Method to Solve Check your connection and try again

1. Go to  "Settings"
2. Click "Advance Settings"
3. Set "Proxy" to "None"

Restart the application and try again to verify. I hope this help.

How to stop android application Auto-Update

Android Auto-Update is an automatic operation of android application. Auto-Update download files automatically whether large or small. it is advisable to update Android Application manually, this will help have a technical idea when something goes wrong on the phone after update. Auto Update uses large part of your data especially for large application and if you are the type that take data usage as a priority, never allow your android smart phone to Update automatically.
METHOD TO STOP AUTO UPDATE ON ANDROID DEVICE
1. Open "Play Store"
2. Tap on "Menu"
3.  Click "Settings"
4. Click "Auto Update Apps"
5. Tick "Do not auto-update apps".
HOW TO UPDATE YOUR APPLICATION MANUALLY ON PLAYSTORE
1. Open "Play Store"
2. Click "Search"
3. Type in the name of the application that needs update
4. Click the name of the "Application" and Click "Update"
NOTE: From the first method, you may choose to Auto-Update over WiFi.

Tuesday, 29 November 2016

See How to Install Android Whatsapp for Q10,Z10,Q5,Z30

whatsapp recently announce the end of new version of Whatsapp for various mobile phone and blackberry Q10, Z10, Q5, OS 10 precisely.  Before the the law will kickofff, blackberry OS10 has an alternative to still used new version of whatsapp. this alternative is the ability to run android version of whatsapp.  Because blackberry OS10 is a cross platform that can run android applications and games. so, when whatsapp keep rolling out version for android, it will also be available for blackberry OS/10 as well. 
i wrote this little article to onveil ways and method of which we can install whatsapp for blackerry.
INSTRUCTION ON HOW TO DOWNLOAD AND INSTALL WHATSAPP FOR BLACKBERRY
1. First you need to download the whatsapp from trusted apk download website and copy it to an SD CARD before moving it to the blackberry devices.
2. On the blackberry device locate the Whatsapp APK file in the SD CARD and click on it to install.
3. install it and enjoy.
NOTE: When downloading APK file, make sure it is downloaded from a trusted website source or you may install  apk Download  (A chromium browswer extension) that will help you pull apk file directly from play store.

How to solve computer connected to wifi but cannot browse

Is your computer connected to wifi that provide internet access and your computer cannot browse with the internet services provided by the wifi? In this case , there are many issues that is making a computer connected to wifi unable to browse.
Before providing solution to this problem, make sure that internet service provided by the wifi is working correctly by testing it with another computer or mobile device just to make sure that the problem is not from the wifi provider.
After the computer is connected to wifi, make sure that you are not testing the internet connection with just one browser. Test with two to three browsers to ascertain if the same problem occur.
Also make sure that you are connected to the right wireless Router.
If the wifi services provided by computer follow this tutorial to make sure that wireless provider is not causing the problem.
TRY THIS STEP TO SOLVE BROWSER CANT BROWSE
METHOD ONE.
Go to command prompt (click start > type cmd > enter)
Type this commands (ipconfig/renew) and (ipconfig/all) and (ipconfig/flushdns)
Type those command without adding bracket
Restart the computer, connect and browse. Or check method two

METHOD TWO
Go to control Panel
Click Network and Sharing  Center
Click  Change adapter settings (At the right Navigation Bar)
Right click on the Name of the WiFi the computer is connected to.
Select Properties
Click Internet  Protocols Versions 4 (TCP/ITv4)
Select (Obtain IP  address automatically) and (Obtain DNS server address  automatically)

METHOD THREE
Go to control Panel
Click Network and Sharing  Center
Click  Change adapter settings (At the right Navigation Bar)
Right click on the Name of the WiFi the computer is connected to.
Click Status
Click Diagnose